Saturday, January 8, 2022

MAX16054 Push button latching SPDT switch

 For one of my projects I had to use a SPDT switch, my choices were 

1. A simple mechanical SPDT switch or

2. A soft switch using some IC

I could not use option 1 due to space constraints and so I had to go with option 2. 

Initially I tried to make one using transistors as explained in youtube or electronics sites but was not able to get it working so ended up googling for readily available IC. I bought TI TS5A3154DCUR as the specs specify this as an analog SPDT switch, boy what a mistake. First I did not know VSSOP package was tiny, literally its the size of a small tick 😂. Somehow I managed to get it soldered on a SOP8 to DIP8 adapter(BTW SOP8 has a slight variance from VSSOP8 so I ended up bending the pins slightly 😥). After all this when I connected the pins I found that the IC does not latch to output on trigger. The enable/control pin has to be help high/low for it to switch 😭. What a waste of time, anyway I learnt how to solder SMD components(maybe will do another writeup on that). After some more searching I figured what I needed was a latching push button controller IC. Thats how I ended up with MAX16054 which was perfect for my needs.

It comes in a SOT23 package which is much better than VSSOP. I bought some SOT to DIP adapters from digikey. Here is the pin diagram and typically connections for the push button controller


I was able to solder it on to a DIP6 adapter and get it tested


Here is a video of the push button switch working


After testing I noticed that the push button stops working after sometime and latches to OUT(pin 5). After reading through the datasheet I found that you would need to connect the clear pin(3) to ground or pull down if its not being used. BTW enabling clear would reset/latch the output to OUT.

I hope my blundering is helpful for someone looking for a soft switch or SPDT.


Wednesday, October 27, 2021

Fixing "LID" error in instapot (Duo Crisp)


For anybody having "LID" error in their instapot (Duo Crisp) when using the air fryer

My instapot recently started showing the "LID"error when I use the air fryer lid (not the pressure cooker lid). Afer some googling I tried to press the lid as hard as possible and still no success. In my frustration I took it apart to see if I could figure out any thing (Sorry did not capture that process but its pretty straight forward, all you you would need is a torque and star screwdriver)

Note: If your appliance is under warranty dont disassemble it and void your warranty 

Anyway after taking apart everything I realized the issue was with the contact switch 😭

Yes the one circled below


I pulled and pressed it few times and it started working

Here is a video I made of it showing the LID error


Anyway hopefully its useful to somebody

Wednesday, December 12, 2012

Programming a STC (89C52) microcontroller

After finishing my basics in electronics i wanted to try my hand at programming micro controllers and this post is a direct result of my adventure in learning micro controller programming.

Read on If
  1. You are a newbie to micro controllers and want to learn the easiest way to program i.e. don't want to solder circuits, don't want to learn internals of micro controller(yet) etc., 
  2. You are ready to spend 30 to 40 CAD
  3. If you don't know Chinese(because the micro controller i am using 'STC' is a Chinese made one and has better information in Chinese)
  4. You are ok to do some C coding.
BTW the reason i chose STC was because i did not know a thing about micro controller programming when i started so i bought the cheapest one with the most  functionality i saw.

STC is a Chinese design company which produces improved derivatives of the classic 8051 MCU. You can get more info from stcmcu.com (in English en.stcmcu.com)  or mcu-memory.com. The STC chips seems to be manufactured by a variety of other companies e.g stcmicro.com, stc-51.com, also i see reference to the Taiwanese company tsmc.com, anyway this does not matter to us.

The one i am using is STC89C52RC(why? because that's the one that came with the kit :) )
I think its better to buy a development board with the latest MCU i.e the 90, 10, 11, 12 or 15 series as it has English software and manual.
BTW stc-51.com is selling development boards(starter kit at 25 USD) with the STC12C5A60S2 chip which has the English programming tool(STC ISP V4.86)


Terminology used below:

MCU Microcontroller Unit
IDE Integrate Development Environment A graphical development tool which combines a editor, compiler, linker etc.,
ISP In System Programming A way to load user program into MCU without removing the MCU from the target system
ICSP In Circuit Serial Programming A subset of ISP
IC Integrate Circuit


Things you need:
  1. A MCU development board
  2. A cross compiler
  3. A Programmer
MCU development board:
A development board is a circuit board which holds the MCU and has other components to test the MCU. The components may be other IC  or discrete ones like LEDs, buttons, relays etc., For us this is the target board.
I got a development board (STC Kit) which also supports programming through serial interface.
It cost me about 30 CAD and comes with everything you need to start writing programs for MCU and to test your programs.The only snag here is that everything is in Chinese !!! I had to use Google to translate to English. I have provided the details of all that i have learnt through this process.

STC Development board

Closeup of the MCU (This is a 40 pin DIP - Dual Inline Package)


Cross compiler:
A compiler is a software which convert your human readable program into machine language which the machine(microprocessor within the computer) can understand.
A cross compiler is a compiler which generates the machine code in a format different from the processor it is running on e.g. it runs on your PC and generates code for MCU and the architecture of the microprocessor in you PC(x86) is different from the MCU(8051). The destination architecture is called the target.

One good cross compiler is Keil. You can  download a demo copy of Keil from https://www.keil.com/c51/demo/eval/c51.htm. This has the µVision IDE and C51 compiler for writing and compiling C program. Although the demo has limitation on the size of binary generated etc., this is enough for starter. 
Note: There are other commercial and open source compiler and IDE which you can use for 8051. 
I feel its better to use Keil as i found it to be small, simple and easy to start with albeit some limitations. Go ahead and use the open source ones if you are comfortable setting up the tool-chain(i.e compiler, linker etc)

Keil also provides a lot of sample programs for 8051, refer http://www.keil.com/download/list/c51.htm

You can also use an assembler e.g. A51 from Keil or BASIC e.g BASCOM if you are comfortable or familiar with those.

Programmer:
A tool to transfer the machine code to the MCU
A programmer consist of a  software part and/or a hardware part. The above development boards supports programming using serial port and comes with a USB to serial adapter cable(more on this later)
The accompanying CD comes with a programing software(STC ISP V4.80)
If you are buying a universal programmer make sure it supports the MCU in the development board and also has a good user manual in the language you understand.
BTW most of the MCU nowadays support ISP so you can buy a USB ISP tool and wire it to the ISP pins on the MCU or to the ISP port on the development board.


The Real Stuff:
At this point if you have got the stuff 1 &2 from 'Things you need' you are ready for setup and then to write your first program. Below are the steps you should follow

Step 1: Install the USB to Serial driver
This is needed to download your program into the MCU
 
Install the driver (HL-340) from the CD or google for HL-340 driver


 Click on INSTALL


 After installing the driver connect the USB to Serial cable to your PC using the USB port.


Windows will prompt you to install driver for the new hardware, chose windows to automatically install the driver.


After successful configuration, verify that the driver has been installed properly using the device manager. You should be seeing a new COM port(e.g COM4) assigned. The port assignment is based on the USB port you connect the cable to.


If you unplug the cable, the device manager will refresh as below


How to open device manager in XP ? Simple, type devmgmt.msc in the Run dialog box(Win key + r)


 Closeup of the USB to RS-232 chip inside the cable
Step 2: Install Keil on your PC


After installing Keil you need to configure it for the STC MCU
Keil has a device database which is used to select a specific target MCU for your program. STC is not available by default but fortunately STCMCU has provided the device database file for Keil. Refer to stcmcu.com for getting the CDB file or download it from STC Artifact

To add STC MCU to Keil device DB:
Based on your version of Keil (uv2, uv3 or uv4), copy the corresponding CDB to kiel install and update the tools.ini file as below
For e.g. if you have  µVision 4 installed in c:\keil
1. Copy uv4.cdb to c:\keil\uv4\uv4.stc.cdb
2. Update c:\keil\tools.ini as follows

[uv2]
CDB0=uv4\uv4.stc.cdb ("STC")


 Now when you list the devices available in Keil(File->Device Database) you can see two groups, "Generic CPU" and STC

All the STC MCUs are under the STC grouping

Adding STC specific registers(optional):
STC has its own set of SFR(Special Function Registers), these are defined in the STC header file, refer to STCMCU.com or  STC Artifact
 
Step 3:  Install the program download tool(stc-isp-v4.80)

Unfortunately i am unable to find the English version of the tool which supports STC89C52RC (i guess its better to buy a development board with the latest MCU i.e the 90, 10, 11, 12 or 15 series).

I downloaded a later version (4.83) from stcmcu.com and installed it


Step 4: Setup and test hardware

Now connect the development board to your PC and switch on the power


You should see the factory loaded program running. :) The board is working !!!
Don't worry if nothing happens, power off and recheck the connections. If still nothing happens, maybe there is no pre-installed program, just carry on.

Now to program the MCU you need to connect the serial cable. Power off the board and connect the USB to Serial cable. Switch on the power and you should see the existing program running again.


Hardware setup and testing is complete


Step 5:  Write a simple program in C using Keil
Startup Keil, create a new project and select the target as STC89C52RC(or the MCU you are using). Create a C source file and add it to the project. Google on how to use Keil.

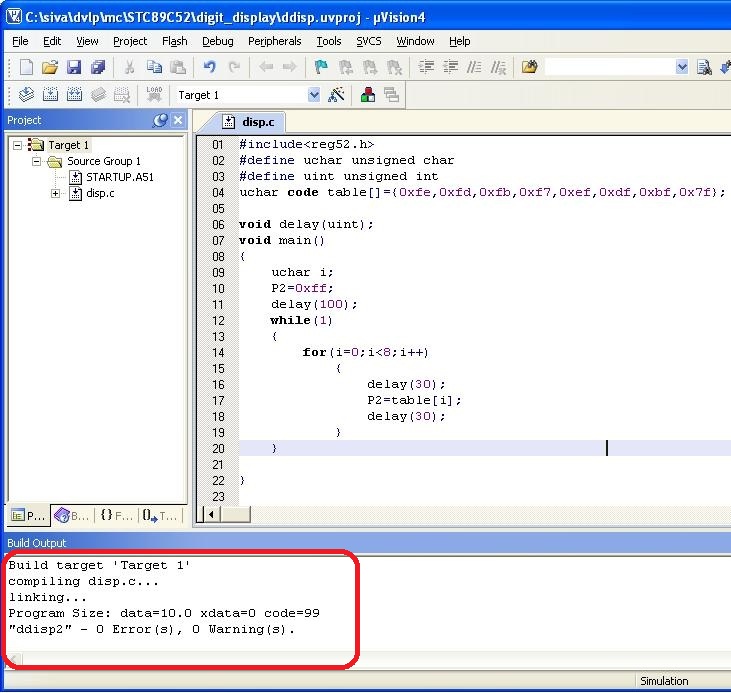
I just copied some code from the CD that came with the board, this displays numbers in the first 7 segment LED display
Compile the program


You should not see any errors in the build output window


If you see some error fix them like you fix any C compiler error

After fixing all the errors now its time to generate .hex file (The hex file is the binary file which is loaded into the MCU, google "hex file format" for more info)

Configure output to generate .hex file


Build target once again to generate the hex file in the project directory


Step 6: Download the hex file into the MCU

Turn off the MCU board

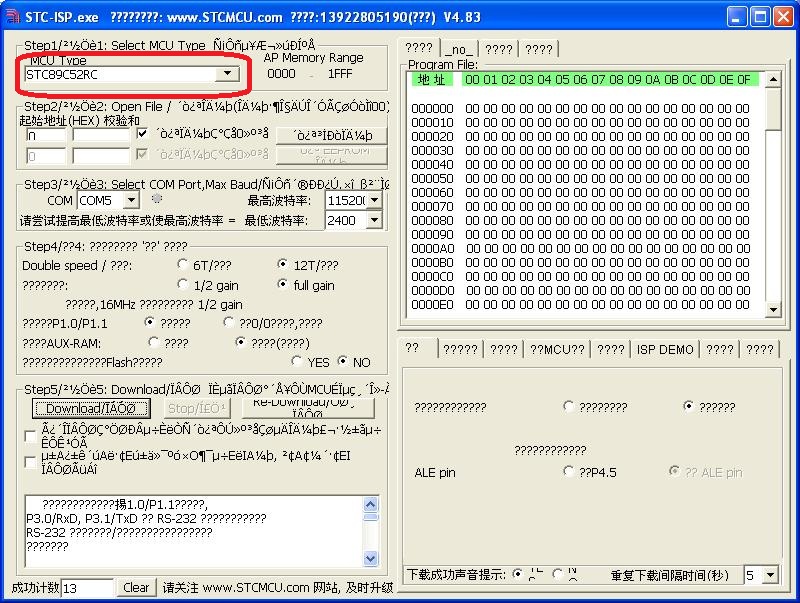
Start the STC-ISP software(double click STC_ISP_V483.exe)
Select the target MCU


Open the hex file


Configure the COM port (1), this is the port displayed in device manager when you connected the USB to Serial cable. Note: The green dot would light up if the correct COM port is selected.

Select download (2)


You should see the programmer waiting (3)

Now power on the development board 

You should see the program getting downloaded


If all goes well you should see the 7 segment LED display light up.


Hurray!!! You have just finished programming a MCU.

Although the above blog helps you in setting up and testing programming a MCU you should read more on
1. Basic Electronics
2. Digital Electronics

3. Writing optimized C code
4. MCU architecture
5. Using the MCU outside a development board.

All the best.

External Links:
Stuff i found related to STC
http://ncrmnt.org/wp/2012/10/01/stcdude-0-1-rc1-is-here/
https://github.com/nekromant/stcdude

If you don't find the STC kit in ebay using the link, search for "STK16 / STK32 STC ATMEL AVR Atmega16 Development Experiment Board MCU AVR"